
 build.share.destroy.repeat
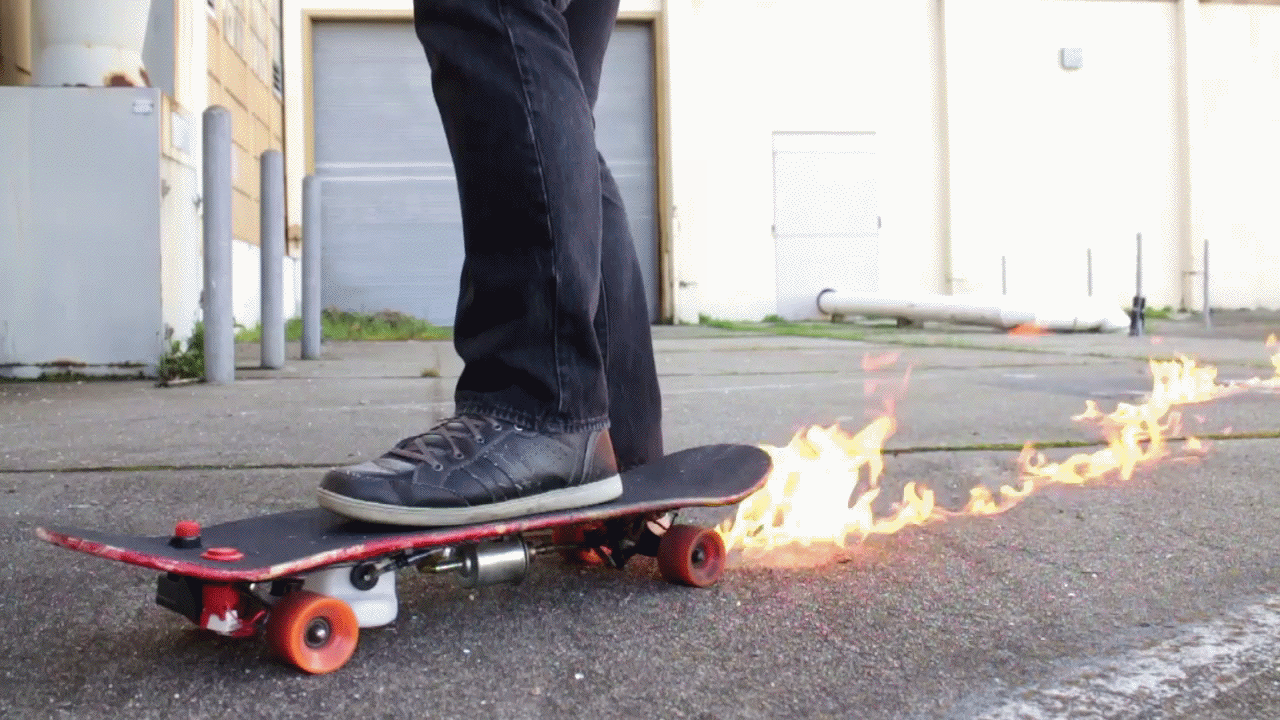
Nothing makes more of a scene when you hit the streets than flames from your skateboard. Whether you're pulling new tricks, or carving downhill, shooting a flame trail behind you is sure to turn heads and get people talking.

Activate a flaming trail when you ride with the push of a button. This skateboard carries a small fuel load on board and uses two switches to dispense and then light the fuel, leaving scorched pavement in your wake.
This relatively simple build has big results. Check out some video we shot around dusk, where the flames are really visible
Ready to make your own and have everyone running for their lives? Let's make!
There's not much to make your skateboard pump flames, a simple fuel pump and a few other parts from the hardware store is all it takes:
- Skateboard (I gave mine a custom paint job)
- 12V universal fuel pump
- 12V rechargeable power supply
- Arcade style push-button with microcontroller switch
- Universal electronic spark generator
- 10oz fuel canister
- 1/4" vinyl tubing
- Hose barb reducer (to focus the fuel spray)
- Velcro tape
- Hose staples
- Multimeter(always a good idea to check your circuits)
Including the skateboard this project was under $100. Some of the components listed here are only sold in sets, where I only needed 1 - the price estimate accounts for only what I used.
| Before committing to mounting anything to the underside of the skateboard the largest components were arranged to see where things fit best. The pump and tank were the most cumbersome items, and had to be strategically placed as to not interfere with the wheels and trucks of the skateboard, all while still having enough clearance so the board could roll unhindered. When the major components were roughly placed I checked to make sure the vinyl tube could connect from the fuel tank to the pump without a sharp turn that would cause a kink. |
 |
| Once all the components looked like they would fit, Velcro tape was placed on the fuel tank and battery with corresponding Velcro tape in select locations on the underside of the board. |  |

| With the fuel tank and battery being removable, each could be safely disconneccvted from the board and refueled and recharged separately. The fuel pump was heavy and required to be mechanically fastened to the board with screws. |
 |
I first thought I wanted to make the flame trail operable with a hand remote, but decided having everything contained within the board itself would be a cleaner look. So the switches to operate the fuel delivery and the spark generator were mounted on the front of the board (or back of the board, if you ride in that orientation). |
| After locating where I wanted my switches, I used a hole saw to create an opening for the arcade style button (which would operate the fuel delivery) and a smaller hole saw for the spark generator. |  |
 |
Both switches are designed to be mounted with the flange at the top, and the button part protruding. A corresponding locking nut can be attached from underneath, sandwiching the board in between and secure the switches in place. The spark generator switch protrudes much higher than the arcade button, but there wasn't much I could do about that without opening up the sealed transformer case. I figured the less modifying I had to do the better, so I left the spark generator with it's larger button. |
| The electronics for this project are very easy. The fuel pump operates on 12V DC, a very common voltage which has lots of options for a power supply. |  |
 |
The pump wires were cut and the ends stripped. The battery had a plug which is used to both charge and supply power, the plug was cut off and the wires stripped. |
| The positive wire for the battery pack was labeled, so that was soldered to the pump. The negative wire was soldered to the foot switch, and then back to the pump and terminating at the battery. Once all the wires were soldered I protected the connections with heat shrink. Wires for the foot switch were neatly held in place to the underside of the skateboard with wire clips. |
 |
 |
The electric spark generator works by having two electrodes that create a spark when they are close enough to each other for the electricity to jump the gap. To hold these in the correct position relative to each other, and close enough to the ground to ignite the fuel, I made a metal bracket from a scrap piece of steel. |

|
 |
I cut a T-shape from thin gauge steel and drilled two openings for the electrodes, and one for the king pin screw. The T-shape was bent into a zig-zag shape so it could be positioned correctly when installed. The thin gauge steel was easily bent by hand, and will require refinement after it's attached to the board. The electrodes were bolted to the T-shape and bent so the ends of the electrodes would be close together. After taking this picture I trimmed down the electrodes and made a smaller T-shape to keep things compact. I noticed there was a tendency for the spark to jump the gap at any exposed areas before the electrodes, like where the spark wires met with the electrodes. I used heat shrink and electrical tape to isolate the sparks to just the ends of the electrodes where I wanted them. |  |
 |
There's a few things going on with a fuel tank than just being a bottle to hold fuel. This tank has a cap with two openings in it, one for fuel transfer and the other to provide ventilation when the pump is engaged. |
| To prevent the fuel from coming out the ventilation opening a small kink was put into the vent pipe, the kink will restrict fuel from flowing directly out. |  |
 |
| The fuel tank was 1/8" ID pipe and the pump was 1/4" ID, so an adapter was needed. These adapters have a barbed end, when inserted inside the pipe the barbs catch on the inside of the pipe and are held in place. |
 |
 |
A small length of 1/4" tube was put on the exit side of the pump and then another adapter was put on, which would push the fuel through the 1/8" end and make a tighter more pressurized spray. |

Here's how all the components fit together when installed on the board. The velcro on the fuel tank and battery make removing these components easy to remove and refuel/recharge.
As you can see from this photo, there's scorch marks near the nozzle and spark generator, the flames are intense and you need to keep moving while laying fire tracks.
The profile view shows there's enough clearance to ride unhindered, even for everyday riding. the components were securely held in place without any rattling around. Wheel size is an important factor to consider, and beefier wheels really helped with providing a few extra millimeters of height.

Some minor tweaks were needed to get the flames to consistently light, like the spark igniter proximity to the ground. Now, this board is ready to light up the streets wherever I go!
Though it might seem extreme, there's little danger of anything going too wrong. The fuel tank isn't under pressure, and there's only 10 ounces of fuel on board at a time. As long as you're moving forward when the flames are activated, you're good to go!
|
|